7:49 am - Wednesday - March 8th - GNHS - 50° F, humidity 75%, wind 2 mph out of the west.....partialy cloudy today with a forecast high of 72° F. On this date in 2012 TLE and I were sitting by the fire about 100' from the Gulf of Mexico on South Padre Island......↴
Our 2002 T-Bird in the background
One of the things I have come to appreciate about retirement, and our nomadic life in particular is that there is no rush to complete projects within a given period of time. They take however long they take, and rushing them only leads to mistakes, disappointment, and the 'REDO'. Over the past few years I've taken on a number of time consuming projects with a vague idea of how long I think they should take, but have often found that doing it right often takes twice as long as my estimate. I've written before that during my workaday life most home improvement projects were squeezed into the confines of a 2, or 3 day weekend. The 4 day weekends were rare, and saved for really big projects. I didn't like to have projects linger from weekend to weekend.....it was just my personality. Most people who knew me back then would not recognize me today, because I have become quite comfortable with projects stretching on for a week, or two. As my friend Tom McCloud told me years ago.....projects take as long as they take, and trying to rush them only creates anxiety, and mistakes which must be undone. A great example of this transformation in my DIY personality is the most recent project.....fixing the bathroom sub flooring.
I began the bathroom project back on February 15th, and as of this Tuesday morning (March 8th) it was still not finished. All that remained to complete this 3 week project was to apply the cardboard template I created on Monday to the 2' x 4' oak plywood, cut it out, then spend some time fitting the new sublooring into the space. Not rushing this project gave me time to think through each phase of the project, and come up with solutions to foreseeable problems, one of which was trying to fit the single piece of plywood into that space, which I knew I could not do. My solution, after careful thought, was to cut it into two pieces and fit each one separately, and that is what I did, and that is what worked......
I cut out the design based on the template, and then sawed it into two pieces
.....once I had the pattern cut I then sawed the piece in two, then began to fit the right, more complicated piece first. Once that was done to my satisfaction I turned my attention to the bigger, less complicated piece, which ended up being the most difficult to fit....go figure....lol.
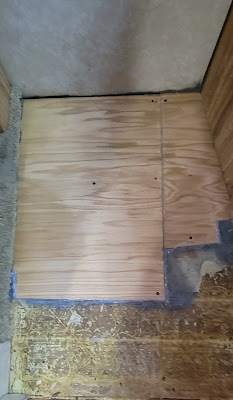
Once I was comfortable with the 'fittment' I then applied several coats of clear urethan to the edges, and both sides and let them dry in the sun. Next, using some gray Rustoleum rattle can paint I had left over from another project, coated all the edges of what remained of the original 3/4" plywood in the bathroom. One that was done I installed the new flooring for the final time, then screwed the two pieces into place, then filled in the small gaps between the new and old subflooring with clear silicone caulk......
Screwed into place...no caulk yet
Then caulked
.....in the end it took me 3 weeks, and change from start to finish, and I could not be more proud of the end result. Now we can begin to pull up all the old vinyl flooring, and install the new. How long will that take? As long as it takes.
Thanks for stopping by!


No comments:
Post a Comment